

How Do I Fill Out a FAFSA Form? A Step-by-Step Guide for Students & Parents

If you have typed “how do I fill out a FAFSA form” into a search engine, you are far from alone. Every year, millions of students and parents face the same question — and the same mix of confusion, urgency, and anxiety that comes with it. The good news is that FAFSA is far more manageable than it looks at first glance. Once you break it into clear, ordered steps, the process becomes straightforward and even reassuring.
FAFSA — the Free Application for Federal Student Aid — is the gateway to federal grants, work-study programmes, and federal student loans. Completing it accurately and on time is one of the most important things a student can do to open up college funding opportunities. This guide will walk you through every step clearly and calmly, so you and your family feel confident from start to finish.
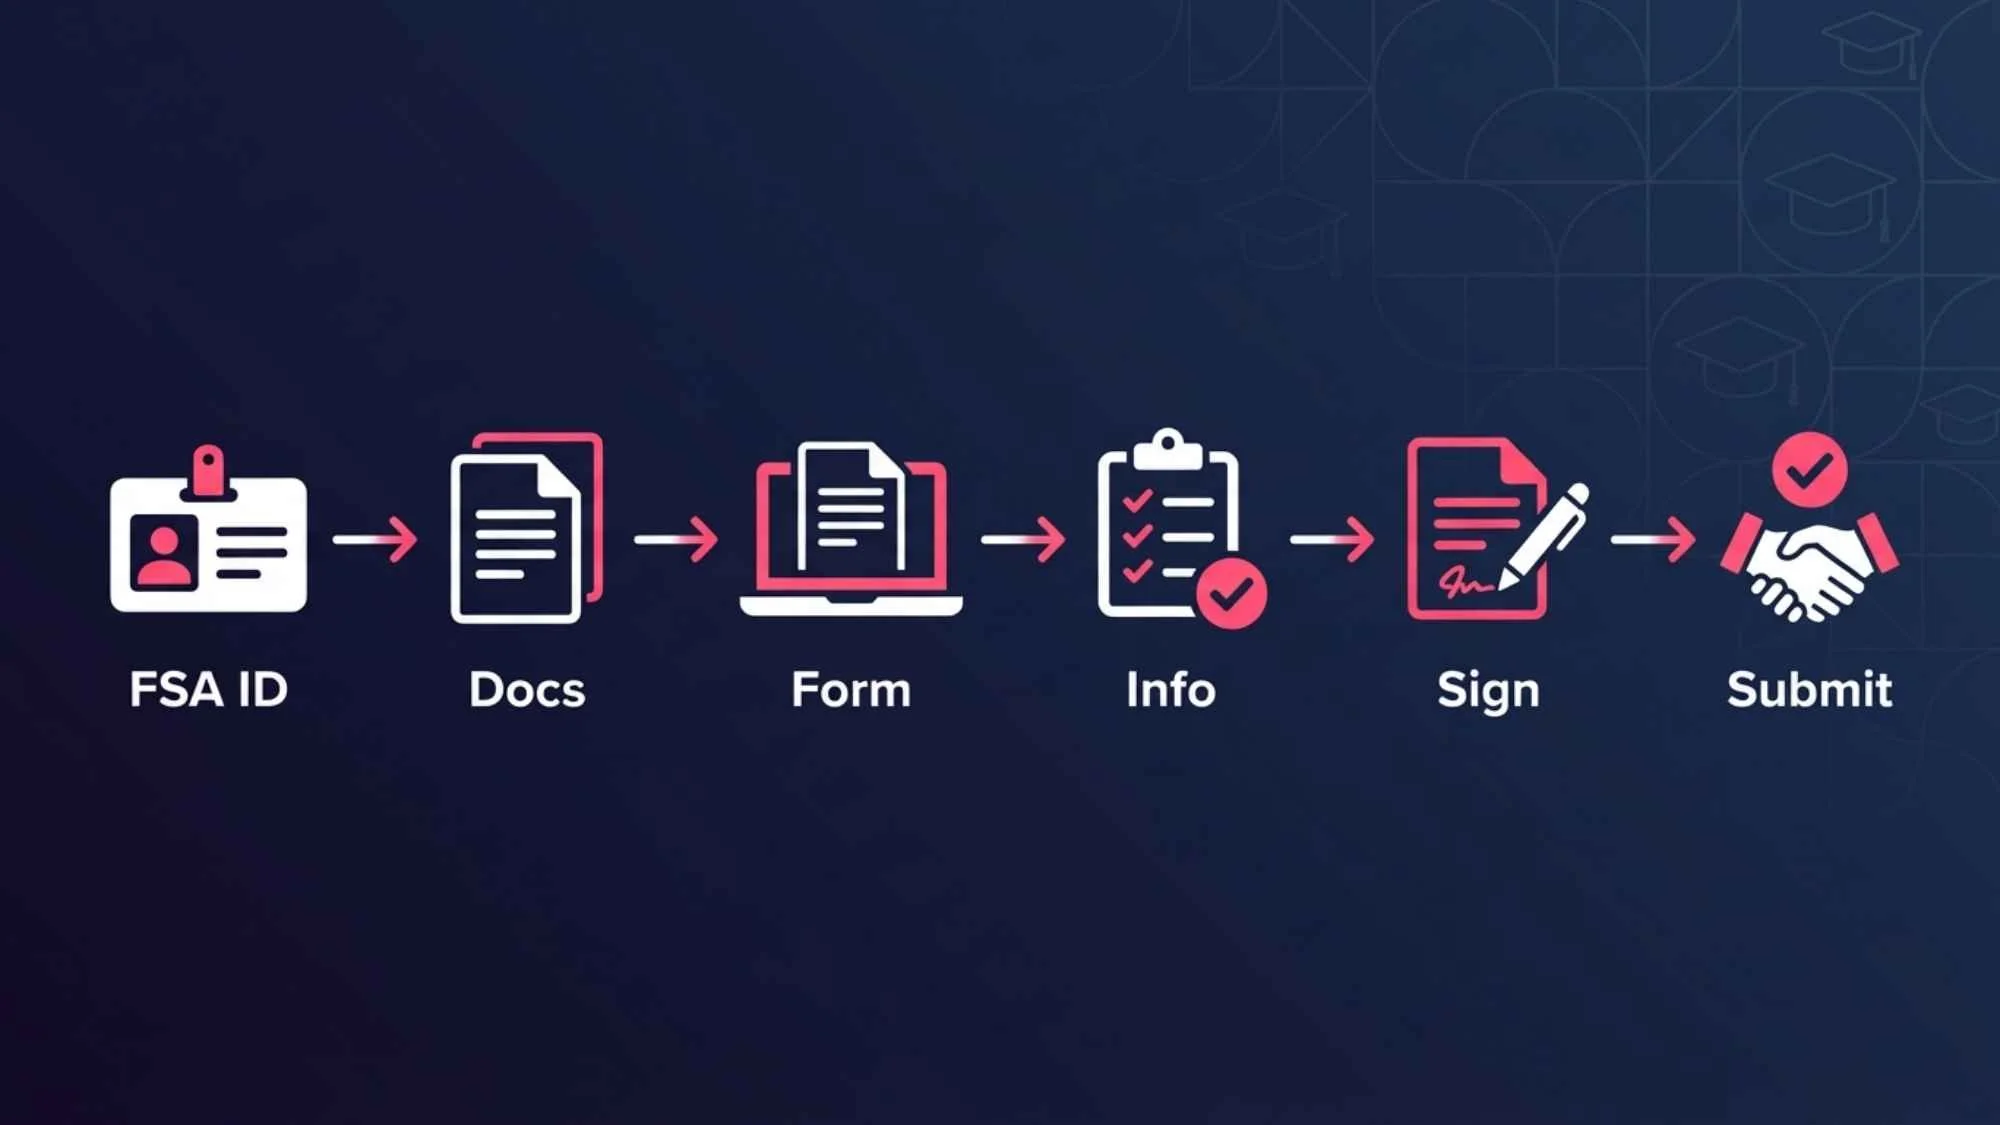
To fill out a FAFSA form, follow these steps:
Create an FSA ID at StudentAid.gov — one for the student, one for the parent.
Gather required documents including Social Security Numbers, tax returns, and bank statements.
Go to studentaid.gov/h/apply-for-aid/fafsa and complete the student and parent information sections.
Enter financial details using the IRS Data Retrieval Tool where possible.
List the colleges you are applying to.
Review, sign with your FSA ID, and submit. You will receive a Student Aid Report confirming your submission.
How Do I Fill Out a FAFSA Form: Step-by-Step Guide
Take a breath — you can do this. The FAFSA has several sections, but each one asks for information you already have or can easily gather. Work through the steps below in order, and you will reach the submit button with confidence.
Step 1: Create Your FSA ID
Before you can even open the FAFSA form, both the student and at least one parent need an FSA ID — a username and password that acts as a secure digital signature. This is the single most important first step, and many families delay because they do not realise both IDs are needed.
Here is what to do:
Go to StudentAid.gov/fsa-id and create two separate accounts — one for the student and one for a parent.
Each FSA ID must use a different email address.
The FSA ID is used as a legally binding electronic signature, so keep your login details safe.
Allow up to three days for the ID to be fully verified before attempting to sign a FAFSA.
💡 Tutor Tip
Create your FSA IDs at least a week before you plan to complete the FAFSA. Verification delays can hold up your entire application.
Step 2: Gather Your Documents
One of the biggest causes of FAFSA errors and delays is students starting the form without the right documents in front of them. Getting organised first saves significant time and prevents guesswork.
Documents to gather before you begin:
Student’s Social Security Number (or Alien Registration Number if applicable)
Parent’s Social Security Number
Federal tax returns — most recent year for both student and parent
W-2 forms and records of earnings
Bank statements and records of savings, investments, and assets
Records of untaxed income (child support, veterans’ benefits, etc.)
FSA ID login details for both student and parent
According to the official Federal Student Aid office, having these documents ready before starting reduces errors and makes the entire process significantly faster.
Step 3: Start the FAFSA Application Online
The FAFSA is completed entirely online. Be cautious: there are unofficial websites that charge fees to help you complete the FAFSA. The official form is always free.
Go to studentaid.gov/h/apply-for-aid/fafsa — this is the only official FAFSA website.
Select the correct academic year. If you are applying for the 2025–2026 school year, make sure you choose that year specifically — selecting the wrong year is a common mistake.
Log in using the student’s FSA ID to begin.
You can save your progress at any point and return to the form later — so you do not need to complete it all in one sitting.
💡 Tutor Tip
The FAFSA opens on October 1 each year for the following academic year. Applying on or close to opening day gives you the best chance of maximising your aid.
Step 4: Fill Out Student Information
The student section asks for basic personal and educational information. It feels straightforward, but accuracy matters — errors here can delay the processing of your application.
Full legal name exactly as it appears on your Social Security card
Date of birth and Social Security Number
Contact information including permanent address and email
Citizenship status and driver’s licence details (if applicable)
Dependency status — the form will ask questions to determine whether you are considered a dependent or independent student
Details about your high school completion and planned college enrolment
Take your time here. A simple typo in your SSN or date of birth can cause your FAFSA to be rejected or significantly delayed.
Image 2
Step 5: Add Parent Information (If Required)
This step confuses many students, particularly those in non-traditional family situations. Here is what you need to know:
Parent information is required if you are a dependent student. The FAFSA considers most undergraduate students under 24 to be dependent unless they are married, a veteran, a parent themselves, or meet other specific independence criteria.
If you are a dependent student, at least one biological or adoptive parent must provide their information.
Stepparents count if they are married to your legal parent — even if they have not formally adopted you.
If your parents are divorced or separated, use the information of the parent you lived with most during the past 12 months.
Foster parents and legal guardians do not count as parents for FAFSA purposes.
If your family situation is complex, the Federal Student Aid office has a dedicated parent information guide that covers most scenarios in plain language.
Step 6: Enter Financial Information
This is the section most students dread — but it is simpler than it appears. You are not being asked to calculate anything yourself; you are reporting figures that already exist on tax documents.
For most families, the FAFSA’s IRS Data Retrieval Tool (DRT) will automatically import tax return data directly from the IRS — this saves time and reduces errors significantly.
You will report income for both student and parent, including wages, business income, and any other earnings.
You will also report assets such as savings accounts, investment accounts, and property (your primary home is not counted).
Do not guess. If you are unsure of a figure, refer to your tax documents or bank statements before entering a number.
Untaxed income — such as child support received, housing allowances, or veterans’ benefits — must also be reported.
Accuracy in this section directly affects your Expected Family Contribution (EFC), which determines how much aid you are offered. Honest and precise reporting is essential.
Image 3
Step 7: List Colleges on Your FAFSA
You can add up to 20 colleges to your FAFSA. Each school you list will receive your financial information and use it to calculate your individual aid package.
Use each school’s Federal School Code to add it — you can look these up on the FAFSA website.
The order in which you list schools does not affect the amount of aid you receive from any of them.
List every school you are seriously considering — you are not committed to attending any of them by listing them.
For state aid programmes, some states require your state’s public university to appear first on the list — check your state’s specific requirements.
Step 8: Review, Sign, and Submit
Before you hit submit, take the time to review every section carefully. Errors found after submission require a correction process that can delay your aid.
Read through every section and confirm all figures match your documents.
Check that names and Social Security Numbers are entered exactly as they appear on official documents.
The student must sign using their FSA ID.
If you are a dependent student, a parent must also sign using their own FSA ID.
Once both signatures are in place, click Submit and save your confirmation number.
Step 9: What Happens After You Submit?
Submitting your FAFSA is not the end of the process — it is the beginning of the financial aid conversation. Here is what to expect:
Processing typically takes three to five business days for online submissions.
You will receive a Student Aid Report (SAR) by email, summarising the information you submitted and showing your Expected Family Contribution.
Review your SAR carefully for errors. If anything looks wrong, you can make corrections by logging back into your FAFSA.
Each college you listed will then send you a financial aid offer letter — usually between December and April — outlining the grants, loans, and work-study funding available to you.
Keep an eye on your email and the student portal of each college you listed. Some schools may request additional documentation before finalising your award.
FAFSA Requirements and Eligibility

Not every student automatically qualifies for federal financial aid. Before investing time in the FAFSA, confirm that you meet the basic eligibility requirements.
To be eligible for federal student aid, students must generally:
Be a U.S. citizen or eligible non-citizen (including permanent residents and certain visa holders)
Have a valid Social Security Number
Be enrolled or accepted for enrolment in an eligible degree or certificate programme
Maintain satisfactory academic progress once enrolment begins
Not be in default on any existing federal student loans
Have a high school diploma, GED, or equivalent
Financial need is not a requirement to complete the FAFSA. Many federal loans and some grants are available regardless of income level, and some states and colleges use the FAFSA to award merit-based aid as well. When in doubt, complete the form — it costs nothing and creates opportunities.
FAFSA Deadline and When to Apply
Timing matters enormously with FAFSA. Financial aid funds — particularly grants and work-study — are often distributed on a first-come, first-served basis. The students who apply earliest tend to receive the most generous packages.
| Deadline Type | Typical Date | Who It Affects |
|---|---|---|
| Federal deadline | June 30 (academic year end) | All eligible students |
| State deadlines | Varies — often Feb/Mar | Check your state portal |
| College deadlines | Often Nov – Feb | Varies by institution |
| Best practice | October 1 (opening day) | Earliest possible applicants |
The federal deadline is the absolute final cutoff, but many state and college deadlines fall months earlier. Missing a state deadline can mean losing access to thousands of dollars in state grant money that is not available through any other route.
💡 Tutor Tip
Mark October 1 on your calendar as FAFSA Day. Completing the form within the first few weeks of it opening is one of the highest-impact actions a student can take for their financial aid prospects.
Common FAFSA Mistakes to Avoid
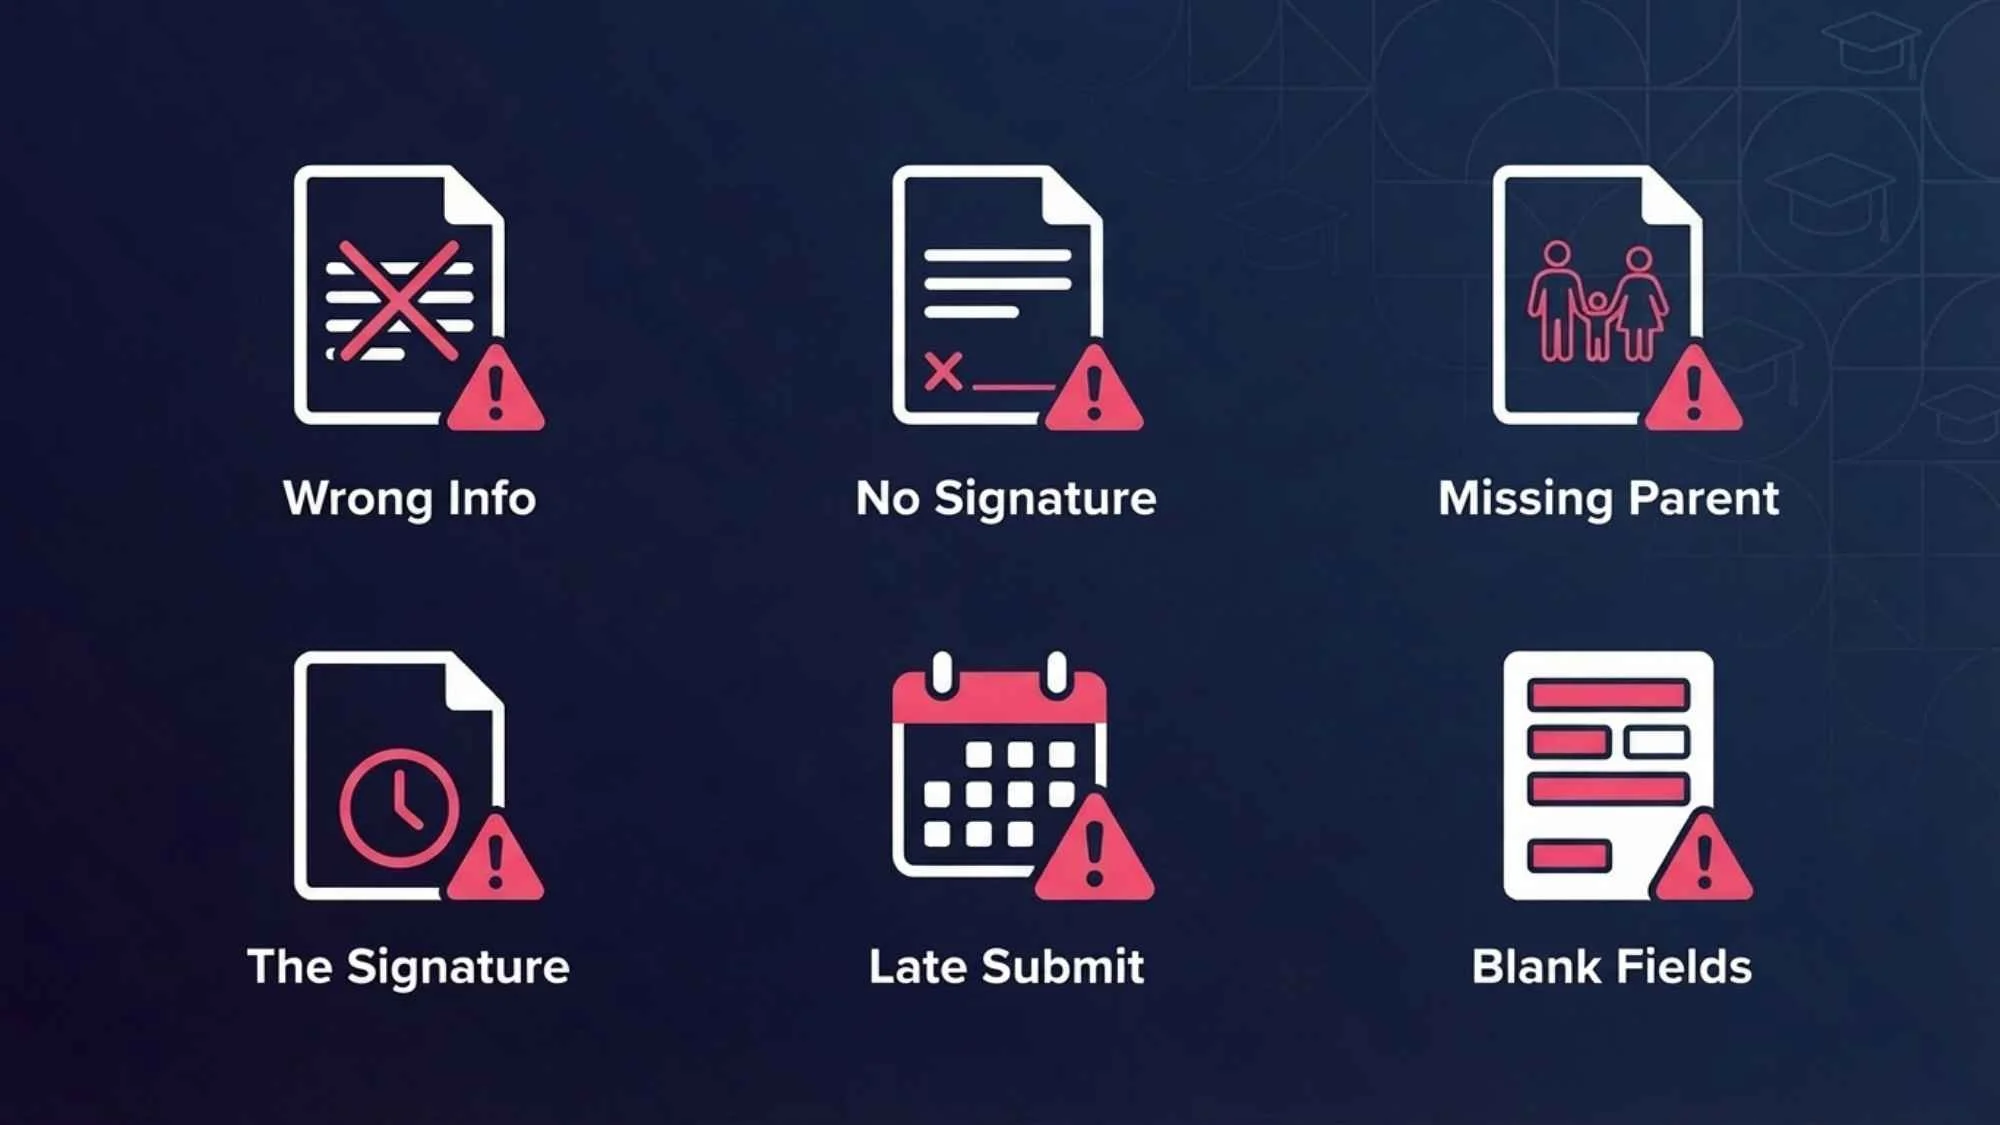
Even small errors on the FAFSA can cause delays, reduced aid, or rejection. Here are the mistakes HYE Tutors sees most often — and how to avoid them.
Incorrect personal details: A misspelled name or wrong Social Security Number will cause your FAFSA to be flagged immediately. Always match official documents exactly.
Missing parent information: Dependent students sometimes skip the parent section or enter incomplete data. Every required field must be filled in.
Leaving sections blank: Every question requires an answer. If a figure is zero, enter zero — never leave a financial field empty.
Forgetting to sign: An unsigned FAFSA is not processed. Both student and parent FSA IDs must be used to sign before submission.
Using incorrect income figures: Using the wrong tax year’s figures — or estimating instead of using the IRS DRT — can distort your aid calculation.
Submitting after the deadline: This is the most costly mistake. Late submissions can mean missing out on grants entirely, leaving only loans as an option.
Tips to Maximise Your Financial Aid

Completing the FAFSA is just the start. These practical strategies can help students make the most of the process and improve their overall aid outcome.
Apply on October 1: Filing as early as possible gives you access to the maximum pool of available funds, especially for state grants that run out quickly.
Double-check every entry: A single numerical error can change your Expected Family Contribution significantly. Take your time and verify each figure against your documents.
List as many schools as possible: Including multiple colleges on your FAFSA gives you more aid offers to compare and negotiate with.
Renew FAFSA every year: FAFSA is not a one-time form. Students must resubmit it for every academic year they need financial aid. Returning students who skip a year can lose aid eligibility.
Contact your school’s financial aid office: If your family’s financial situation has changed significantly since your last tax return — due to job loss, illness, or other circumstances — ask the college about a professional judgement review. Aid can sometimes be adjusted.
Understand the difference between grants and loans: Grants do not need to be repaid. Loans do. Always maximise grant opportunities before accepting loans.
Do You Need Help Filling Out Your FAFSA?
Even with a detailed guide, many students and parents still feel uncertain when they sit down with the actual form. Financial terminology, family situation edge cases, and the pressure of getting it right can make the process feel overwhelming — and that is completely understandable.
At HYE Tutors, we work with students and families to navigate the FAFSA process with clarity and confidence. Our academic advisors guide you through each step, help you avoid common mistakes, and make sure your application gives you the best possible chance of receiving meaningful financial aid.
You do not have to figure this out alone. Whether you are a first-generation college student unfamiliar with the process, or a parent who has never encountered financial aid forms before, we are here to help.
Get step-by-step FAFSA help from an experienced tutor
We help students and parents complete FAFSA correctly the first time.
→ Book a 1-on-1 FAFSA Guidance SessionFAFSA Checklist Before You Submit
Run through this checklist before clicking the submit button. Ticking every item gives you confidence that your application is complete and accurate.
FAFSA Submission Checklist
- ✓ FSA ID created for both student and parent
- ✓ All required documents gathered and verified
- ✓ Correct academic year selected on the form
- ✓ Student information section fully completed
- ✓ Parent information section fully completed (if dependent)
- ✓ Financial data entered accurately using IRS DRT where possible
- ✓ All colleges listed with correct Federal School Codes
- ✓ All sections reviewed and errors corrected
- ✓ Student FSA ID used to sign
- ✓ Parent FSA ID used to sign (if dependent)
- ✓ Submitted before your earliest relevant deadline
- ✓ Confirmation number saved and SAR reviewed
FAQs
How do I fill out a FAFSA form for the first time?
Start by creating FSA IDs for both the student and a parent at StudentAid.gov. Then gather your tax documents, Social Security Numbers, and bank statements. Go to studentaid.gov, select the correct academic year, and work through the form step by step. Both the student and parent must sign electronically before submitting.
How long does it take to fill out the FAFSA?
For most families, the FAFSA takes between 30 minutes and one hour to complete, provided all documents are prepared in advance. First-time applicants often take slightly longer. Using the IRS Data Retrieval Tool to import tax information automatically can save significant time and reduce errors.
Do I need my parents’ information to fill out the FAFSA?
Most students under the age of 24 are classified as dependent and must include at least one parent’s financial information. Independent students — including those who are married, military veterans, or legal emancipated minors — may complete the FAFSA without parent information. The form asks questions to determine your dependency status automatically.
What is the FAFSA deadline?
The federal FAFSA deadline is June 30 of each academic year, but state and college deadlines are often much earlier — sometimes as early as November or February. Many state grants are awarded on a first-come, first-served basis, so applying as soon as FAFSA opens on October 1 is strongly recommended.
Can I save my FAFSA and come back to it?
Yes. The FAFSA can be saved at any point and completed across multiple sessions. Log back in using your FSA ID to pick up where you left off. The form will not be submitted until you actively choose to sign and submit — so take the time you need to gather information and double-check your entries.
Conclusion
Knowing how to fill out a FAFSA form is one of the most valuable skills a student and their family can have before college. The process may look complicated from the outside, but broken down into nine manageable steps — from creating your FSA ID to reviewing your Student Aid Report — it becomes entirely achievable.
The most important things to remember: gather your documents before you start, apply as early as possible, double-check every entry, and make sure both student and parent sign before submitting. Small details make a big difference when financial aid is on the line.
If you would like guided, personalised support at any point in the FAFSA process, the HYE Tutors team is ready to help. You do not have to navigate this alone — and with the right support, you can complete your FAFSA correctly, confidently, and on time.
If your student is preparing for college, expert guidance can make the financial aid process much less stressful.
HYE Tutors supports students and families at every stage of the college journey.
→ Start Learning With a Private TutorAbout the Author:
This guide was written by the HYE Tutors academic advising team — educators experienced in supporting first-generation college students and their families through the financial aid and college application process. Our advisors help students navigate FAFSA, college planning, and academic preparation with clarity and confidence.